Planning Your Dream Kitchen
5 Standard Kitchen Layouts
The very first step of the planning process is to determine the possible layout of your kitchen. There are five basic kitchen shapes: straight, Galley, L-Shape, U-Shape, and G-Shape.
The traditional Work Triangle
The work triangle is the standard configuration used by professionals for designing efficient kitchens. The three magical points are the areas between the refrigerator, range, and sink.
STRAIGHT
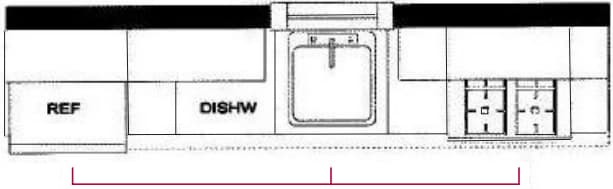
The STRAIGHT configuration is good for smaller homes and apartments. It offers the least efficient kitchen plan but maximizes space.
GALLEY
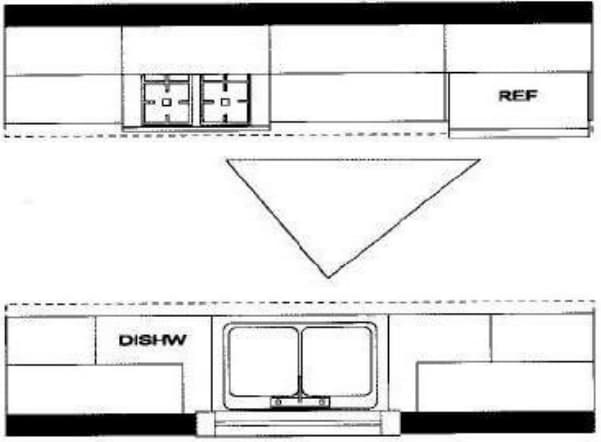
The GALLEY configuration is efficient for up to two cooks in the kitchen. However, the shape allows little extra room for crossing household traffic.
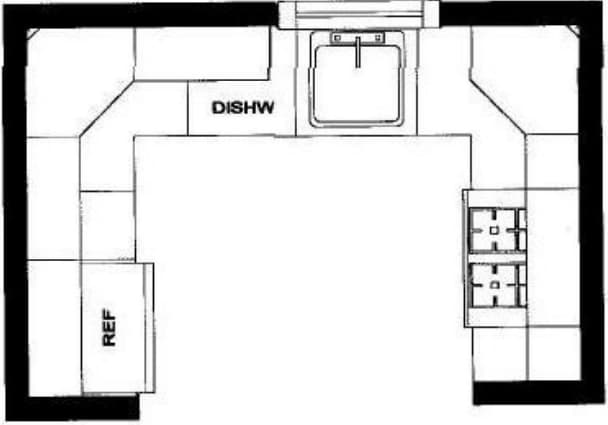
L-SHAPE
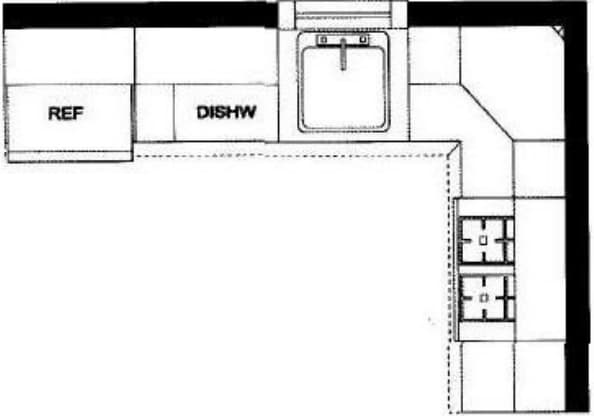
The L-SHAPE kitchen is the most common kitchen layout in American households. It provides a good amount of continuous counter space, and the magic work triangle is executed perfectly.
This design can also allow for the inclusion of a dining area or island.
G-SHAPE
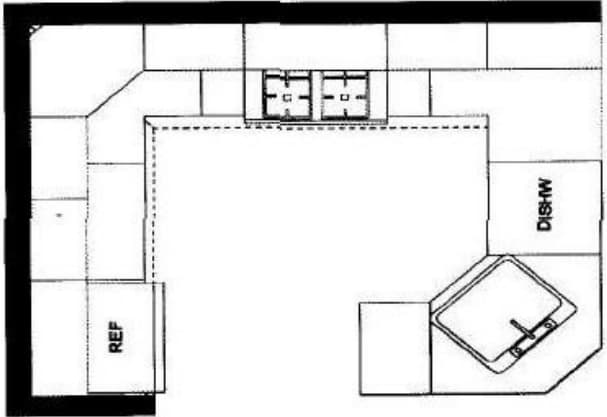
The G-SHAPE kitchen is a step up from the U-Shape kitchen.
This design adds extra cabinet and counter space. In order to avoid feeling too closed-in, this layout works best when two of the walls are open to adjacent spaces.
U-SHAPE
The U-SHAPE kitchen is ideal for the solo cook. The continuous countertop and cabinets surround the cook on three sides, putting everything within reach.
GETTING STARTED
MEASURE YOUR SPACE
Accurate measurements are essential to planning your new kitchen. With these measurements, your designer will be able to help you create your dream kitchen.
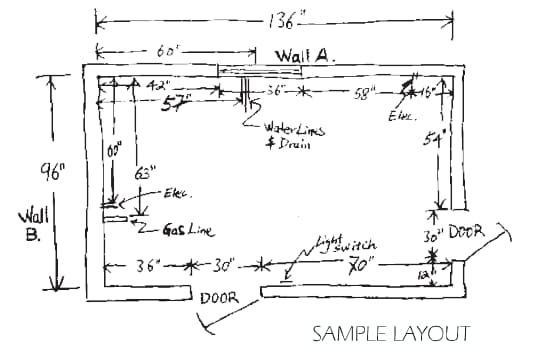
FLOOR PLAN
Using the measuring procedure illustrated, carefully prepare a simple floor plan for your existing kitchen. Your completed floor plan should resemble the diagram shown. Make sure you show the exact locations of doors, windows, range hood vents, gas lines, water lines, drains, switches, outlets, light fixtures, and vents. Double-check all measurements.
MEASURING PROCEDURE
Using a tape measure and graph paper, measure as outlined.
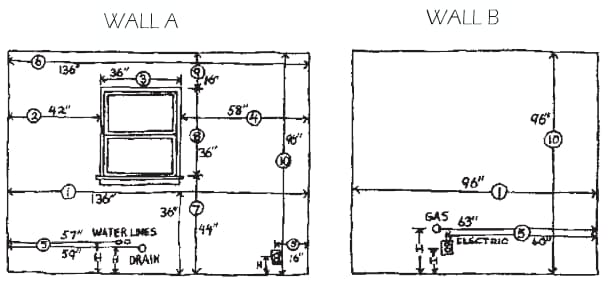
Horizontal Measurement
- Measure from wall to wall at 36″ height.
- Measure from corner to window or door opening.
- Measure across opening from trim edge to trim edge.
- Measure from edge of trim to far wall. Compare the sum of #2, #3, and #4 measurements to step #1.
- Mark exact location of water line, drain, gas line and electrical outlets/switches on drawing.
- Measure from wall to wall above window and compare to #1.
Vertical Measurement
- Measure from floor to window sill.
- Measure from window sill to top of window.
- Measure from top of window to ceiling.
- Measure from floor to ceiling-Compare to the sum of #7, #8 and #9.
APPLIANCE / FIXTURE INFORMATION
Show desired locations of appliances on the drawing. It is very important to indicate natural gas locations, 110-volt outlets, wall-mounted telephone locations(T), and cable TV outlet locations (CTV).
| Type | Size (WxHxD) | Hinge Position (L/R) | |
| Refrigerator | |||
| Range Hood Vent | |||
| Cooktop | |||
| Dishwasher | |||
| Sink | |||
| Disposal | |||
| Trash Compactor | |||
| Other |


